Wednesday, 7 January 2015

Change “Site URL” property in Visual Studio 2012 for Deploying SharePoint projects

Change Site URL property in Visual Studio 2012 for SharePoint projects,Change “Site URL” property in Visual Studio 2012 for Deploying SharePoint projects.


Today we offer a quick tip about Changing the “Site URL” property of a SharePoint Solution Project Created in Visual Studio 2012. “Site Url” property is used to specify the SharePoint site where the User intend to deploy you his SharePoint project. Typically when you Create an SharePoint Project you specify the Site Url property in SharePoint Customization Wizard but in case you specified the wrong URL or want to change it some other site you can do that by Changing “Site URL” property of the Project.
Site Url is one of the properties of the Project so the first guess would be to look under project “Properties”.So if you right click on the Project and Click on “Properties” towards the end, you will find yourself in Properties Page with a bunch of project properties but no option for Site URL in any of the tabs.For some reasons the property “Site URL” for was not included here.It was instead included in Properties Window for the project.
Properties Page and Properties Window are two separate blocks that displays project properties in the new Visual Studio. So now lets open Properties Window to Change our “Site URl” property.
Click on the project in Solution explorer and then click on “View” tab in Visual Studio and Open “Properties Window” towards bottom (See below).


Finally, Change the Site Url property in the property window.

Tuesday, 6 January 2015

Expand or Collapse All Grouped Items on SSRS Report

e have a few reports which group the first column of data, then hide the detail rows when the report is initially displayed.  This is a commonly used solution, and a really nice feature to conserve space on the page.  However, by default SQL Server Reporting Services doesn’t provide the end user with a one-click option to “Expand All” or “Collapse All” of the grouped rows. 
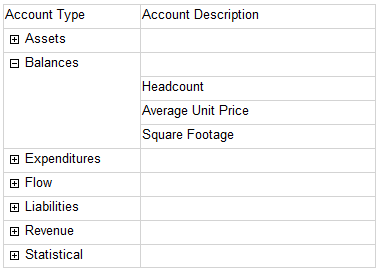
As an example, here is a very simple report which would require the end user to click 7 times in order to see the complete list. 
Much more than a couple of clicks can be a little annoying, particularly if the end user is in a hurry.  In my opinion, too many clicks reduces the usability of a report & could prevent the end user from seeing something pertinent.  For those reasons, I wanted to find a way to implement two buttons on the report:  one button to ‘Expand All’ rows and one to ‘Collapse All’ rows.
Note:  for purposes of this example, we are focusing on functionality & overlooking nice report formatting which I would normally do.
1. Create a new report.  I'm calling mine AccountListByType.
2. Create a dataset, using AdventureWorksDW2008.
SELECT  AccountType, AccountDescription
FROM DimAccount
WHERE  AccountType <> ' '
3. Add a table to the body of the report.  Add the AccountDescription field to the Details row.  You may delete the 2nd and 3rd columns.
4. In the Row Groups pane, right-click the Details group and choose to Add Group > Parent Group.  In the 'Group by' choice, select AccountType.  Check the box to ‘Add group header.’   (If 2008 but not R2 yet:  Change the column title to Account Type.)
5. If 2008 but not R2 yet:  In the Row Groups pane, right click Group 1 and choose Group Properties.  Rename it to Group_AccountType (because Group1 is not a very helpful name).  Set the Sorting to be first on Account Type, then on Account Description.
6. If 2008 but not R2 yet:  On the report body, select the textbox with the grouped data.  In the Properties pane, replace the Group1 Name with txt_AccountType.  R2 will already have AccountType as the name - you may prefix it with txt if you'd like - I tend to do that & it's my cue that I've done something else, somewhere in the report with that textbox. 
It's important to ensure the textbox name is descriptive because we are going to be using this textbox in a toggle property, so it’s helpful to use a good name.
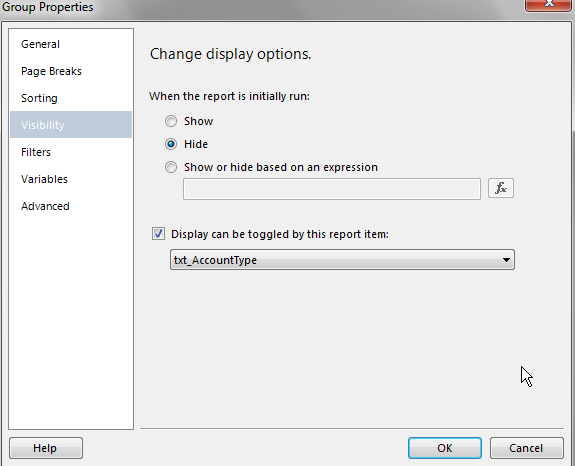
7. In the Row Groups pane, right-click the Details group and choose Group Properties.  On the Visibility settings, choose the radio button to Hide the details.  Check the box so that ‘Display can be toggled by this report item’ and select the txt_AccountType textbox we just renamed in the previous step.
8. Test the report here to ensure it runs properly.  At this point we have the report created that was shown at the very beginning of this blog entry.  Next comes the fun part.
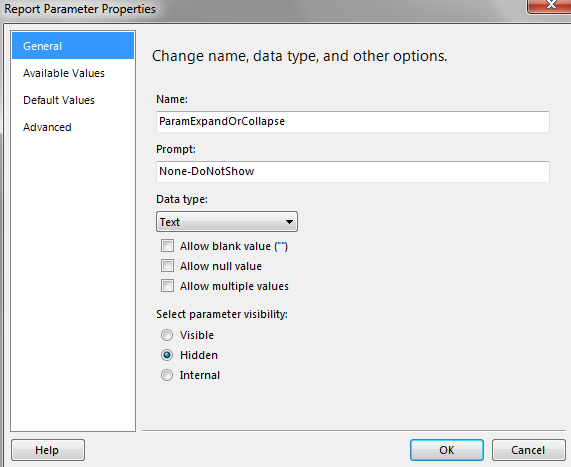
9. Create a parameter called “ParamExpandOrCollapse” (or whatever fits your normal naming convention).
General
Prompt:   None needed, as this will be hidden.
Data type:  text.
Parameter visibility:  hidden.
 
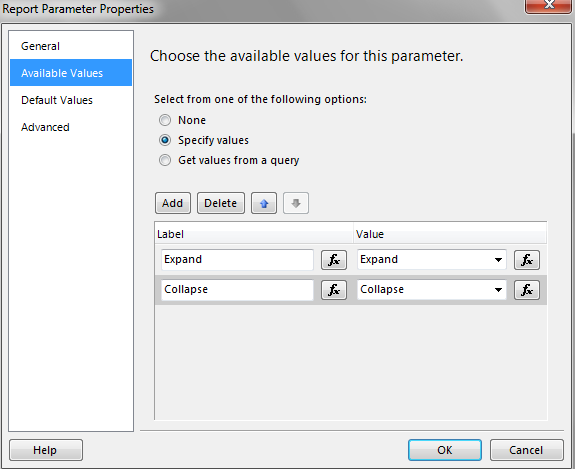
Available Values
Specify values works well for this situation. 
Add two choices:  one to Expand, and one to Collapse.  The Label and Value may be the same.
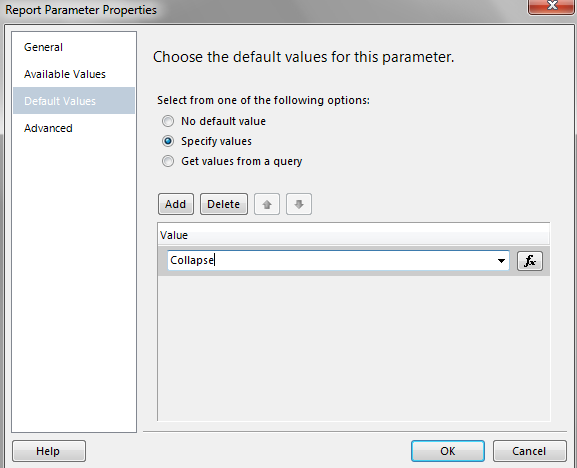
Default Values
Specify values works well for this situation. 
Add the value Collapse as the default.
 
10. In the Row Groups pane, right-click the Details group and go to its Group Properties.  On the Visibility settings, change the radio button from Hide to ‘Show or hide based on an expression.’  Enter the following expression:
=iif(Parameters!ParamExpandOrCollapse.Value = "Collapse"TrueFalse)
11. On the report, select the txt_AccountType textbox.  In the Properties pane, set the Initial Toggle State property to the following expression.  This will cause the + or – symbol to display correctly based upon the current parameter value.
=IIF(Parameters!ParamExpandOrCollapse.Value = "Expand",True,False)
12. On the body, above the table, create two textboxes which will serve as our buttons - the the end user will interact with these buttons.  (These two textboxes don’t really look like buttons so images would work better in a real life situation.)
13. Set properties for both of the buttons.  This is where it all comes together.  When the user clicks a button, a report Action will call the same report (i.e., this report is calling itself, rather than drilling through to another report which would be a more normal use of an Action).  By using a report Action, we are able to set the parameter values. 
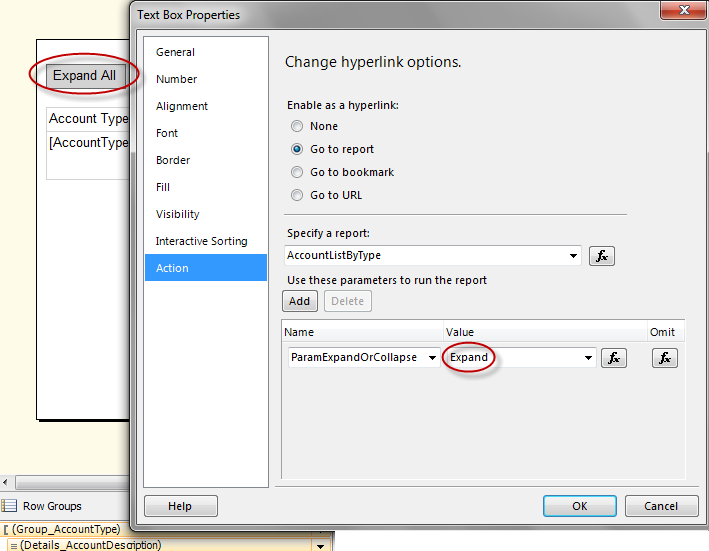
Choice 1:  Use a ‘Go to Report’ Action. 
Following are the Action properties for the Expand All textbox, when Go to Report is the Action.
Specify a report:  the same report we are currently working in.
Parameters to run the report:  Name - ParamExpandOrCollapse.  Value – Expand.
Do the same thing as above for the Collapse All textbox, with the Value being “Collapse” instead.
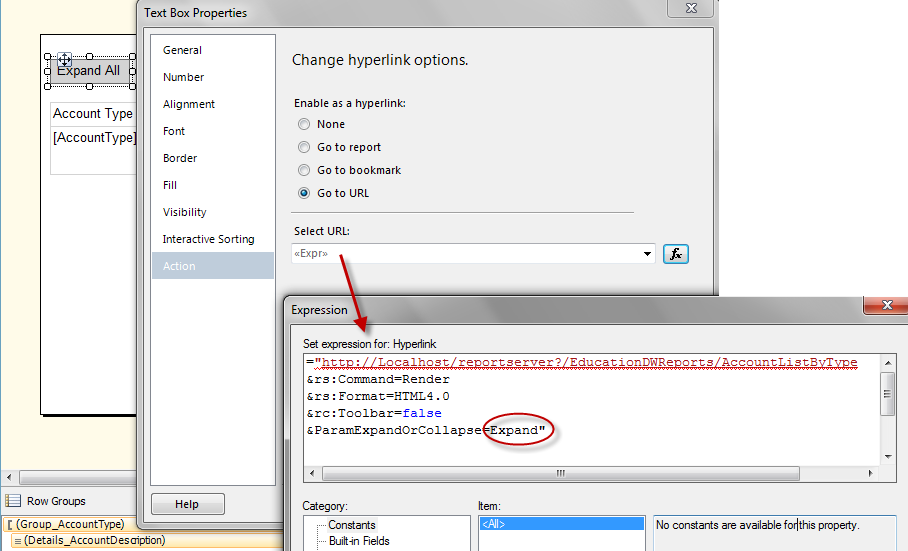
Choice 2:  Use a ‘Go to URL’ Action. 
Following are the Action properties for the Expand All textbox, when Go to URL is the Action.
="http://Localhost/reportserver?/EducationDWReports/AccountListByType
&rs:Command=Render&rs:Format=HTML4.0&rc:Toolbar=false&ParamExpandOrCollapse=Expand"
 
Do the same thing as above for the Collapse All textbox, with the parameter passed in the URL being “Collapse” instead.
That’s it.  To my knowledge, we cannot access a property within SSRS to obtain the current toggle state, so we are making use of the parameter state instead.  The key to making it all work is finding a method of setting the parameter without displaying the parameters pane.  The report Action serves that purpose by setting the parameter state when the user clicks one of the buttons.  In the first link below under References, Paul Turley mentions that the query is not re-executed which is good from a performance standpoint.
This idea could be expanded so that if you have several nested groups, where visibility for each is controlled by the above group, you could create different buttons that only expand a group at a time rather than everything on the entire report.

SSRS Page 1 of 2? Problem

Starting in reporting services 2008 there is a new feature called On Demand processing.
http://msdn.microsoft.com/en-us/library/bb630400(v=SQL.100).aspx#OndemandProcessing
With this feature reports may be rendered only one page at a time to speed up processing. One drawback to this can be seen on large reports. On your action bar, you may see page 1 of 2?
Here is an example:
One trick to avoid this is to add a textbox in your report header or footer. On the properties of the textbox, set Hidden=True. For the expressoin of the textbox, set it to =Globals!TotalPages.
Now when the report runs, it figures out the total number of pages to put into this textbox. And as a result, it also puts the correct number in your action bar!

Master Data Services SQL Server 2012 Vs 2008 R2


“What features does MDS 2012 have compared to MDS 2008R2?”. As its happened quite a few times, I thought it would be a good idea to put a quick post together to explain the differences. The table below details all the features MDS has and compares the two versions:

Feature
MDS 2012
MDS 2008 R2
Front End
·New Silverlight UI added for the Explorer area. Better performance, with less clicks to get tasks done.
·         Excel Add-in introduced
·         HTML based ASP.NET implementation.
·         No Excel Add-in
Modelling
·         Carry out in the web UI, plus some tasks can be carried out in Excel
·         Allows the auto generation of a code without using business rules
·         Carry out modelling in the web UI only
Hierarchies
·         Three types of hierarchies
·         Manage hierarchies in the new Silverlight UI
·         Three types of hierarchies
·         Manage hierarchies in the older UI style
Collections
·         Add members from Explicit Hierarchies or other Collections
·         Maintain a weighting on a member by member basis
·         Add members from Explicit Hierarchies or other Collections
Staging Process
·         A staging table is created per entity that you create in MDS. The table mirrors the exact structure that you see when you view the entity in the front end, making loading easier.
·         A generic staging table is used for all entities. This means, for example, you must load attribute changes in attribute name/value pairs
Deployment
·         Deploy the model structure from the front end.
·         Deploy the data from the new command line deployment tool
·         Deploy model structure and data from the front end
Security
·         Grant permissions to models, entities, attributes and attribute groups
·         Security cleaned up and simplified (no longer necessary to grant permissions to hierarchies)
·         Grant permissions to models, entities, attributes, attribute groups and hierarchies
Business Rules
·         Alter attribute values, validate data integrity, initiate workflow.
·         Some minor validation changes around using business rules to auto-generate Code values
·         Alter attribute values, validate data integrity, initiate workflow.

SharePoint Integration
·         Initiate a SharePoint workflow from MDS business rules
·         New functionality to embed the web UI inside a SharePoint page
·         Initiate a SharePoint workflow from MDS business rules

Data Quality Services (DQS) Integration
·         Connect to a DQS matching policy from Excel, against MDS master data
·         No DQS capability, as DQS is new in SQL Server 2012
Version Management
·         Create multiple copies of your master data and work with them independently as needed
·         Some minor UI improvements have been added
·         As SQL 2012, create multiple copies of your master data and work with them independently as needed
Transactions (auditing)
·         Transactions removed from Explorer and now are only available in Version Management
·         Therefore users cannot reverse their own transactions, only administrators can do this
·         Annotations are now permanent and cannot be deleted
·         Transactions viewable in two areas, Explorer and Version Management
·         Users can reverse their own transactions
·         Annotations can be deleted
Metadata
·         No support to view Metadata – this is now a deprecated feature
·         Customise the metadata for most objects in MDS
·         View metadata in the metadata explorer
Installation & Configuration
·         Installation from the main SQL Server setup program
·         Minor changes to the configuration settings
·         Installation from the SQL Server media, but not included in the main setup program